FIELD & FOREST

breakfast

west coast rarebit

autumn, breakfast, dinner, lunch, snacks, main dishes, vegetarian, winterRachel SandersComment

I have a big ole lady crush on Charlet Duboc from Munchies, who hosts the Munchies Guide to Scotland and the Munchies Guide to Wales. This is mainly due to her lack of filter during interviews and her rather adorable habit of getting drunk with the locals and then having a wee lie-down on lawns/sidewalks/etc. After being more than a little tired of the Food Network as of late, I would like to note that this is me officially raising my hand and saying that I like the direction in which food journalism is going! More real people doing real things in real places, please.

(BTW, Munchies seems to be killing it in this area. Give them a look-see.)

Sometimes in watching a show about a specific cuisine, I'll feel like a piece of my soul is from that region/country. I really feel this way about India (because spices), Italy (because pasta), France (because garlic and butter and seasonality and my dad's cooking), Hungary (because chicken paprikash and goulash and my mom's and grandma's cooking) Japan (because unagi and miso), and Sweden (because hygge!!).

If any part of my soul is Welsh, it is the part shaped like a piece of cheese toast. Because rarebit.

I would like to take a liberty and describe rarebit (for those of you who aren't sure what it is, which was also me about a week ago) as portable fondue. Yes! I know! How awesome is that. My mom used to make kind of a quick-and-dirty rarebit when we were growing up with aged cheddar and garlic powder, which is still one of my favorite ways to eat cheese on toast, but there wasn't any beer involved and that seems to be key to this whole rarebit thing. Plus some mustard powder and Worchestershire and a little extra added fat in the form of butter, cream, and/or egg yolks to keep the whole thing melty and luxurious.

Imagine everything you like about fondue but on a piece of toast. And now imagine that you are eating this with friends, but you don't have to worry that some gluttonous person is going to have a field day in the fondue pot before you can skewer a cube of bread because you have your VERY OWN piece of toast.

Yeahhhhhh.

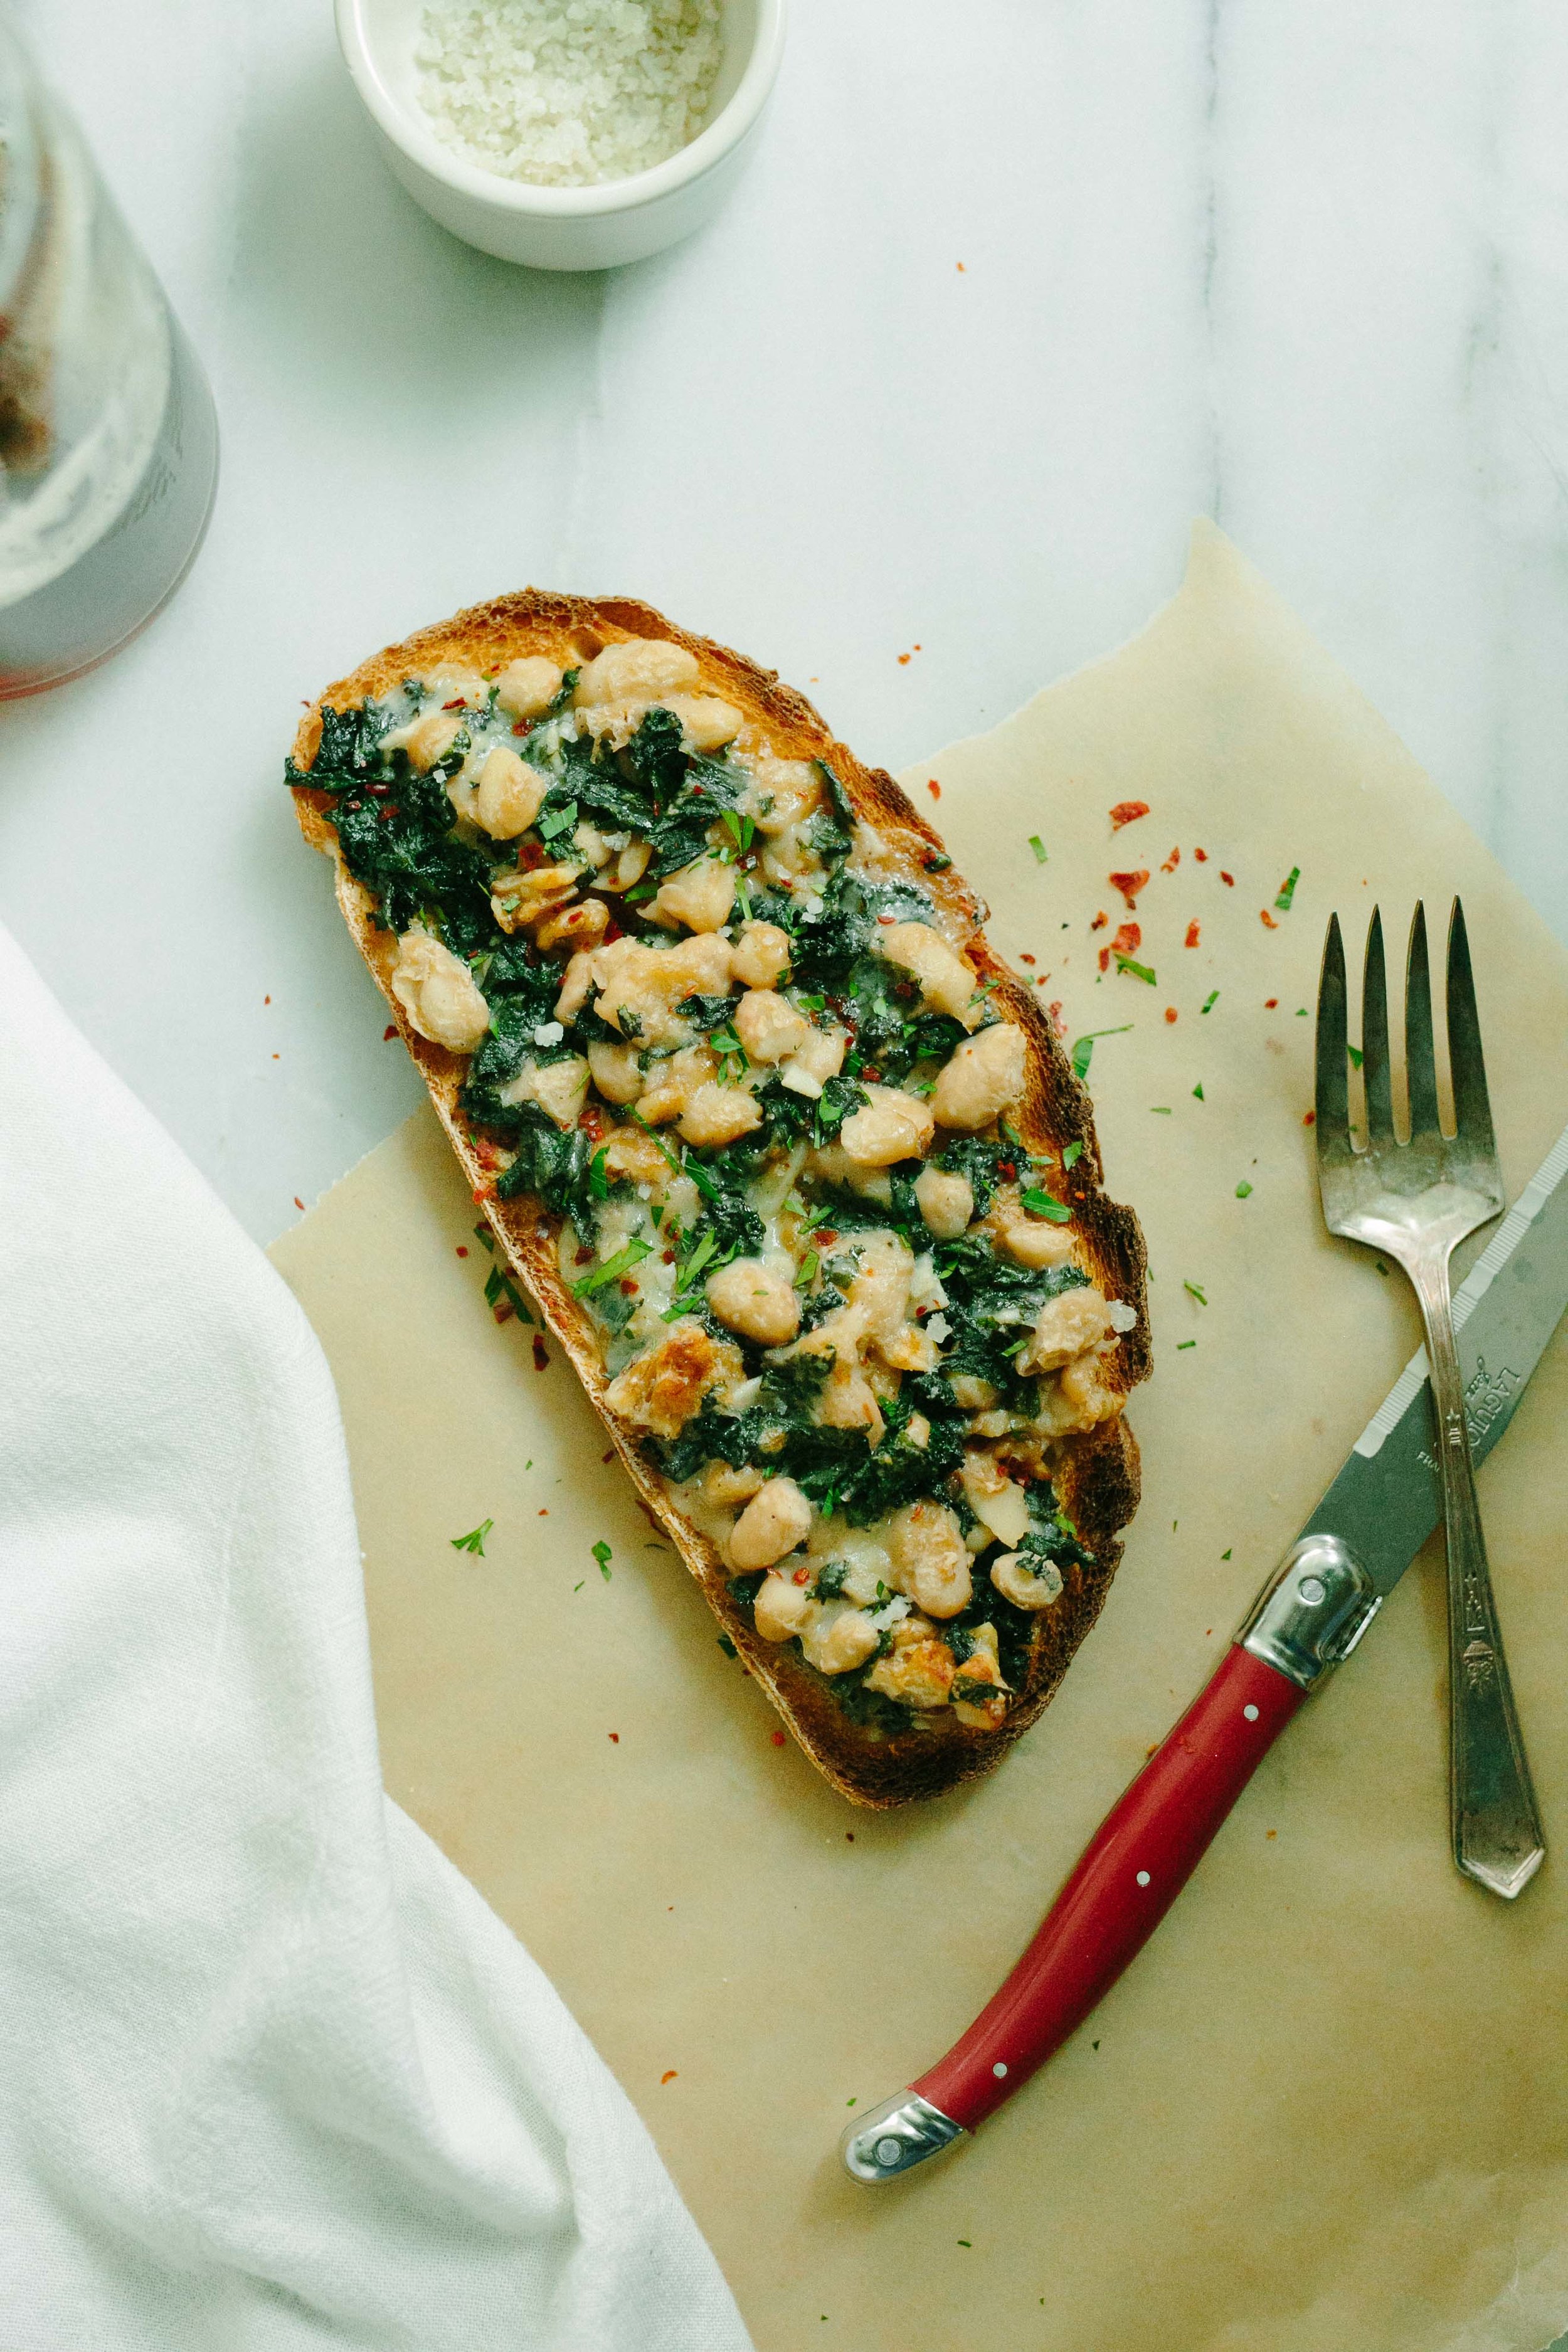
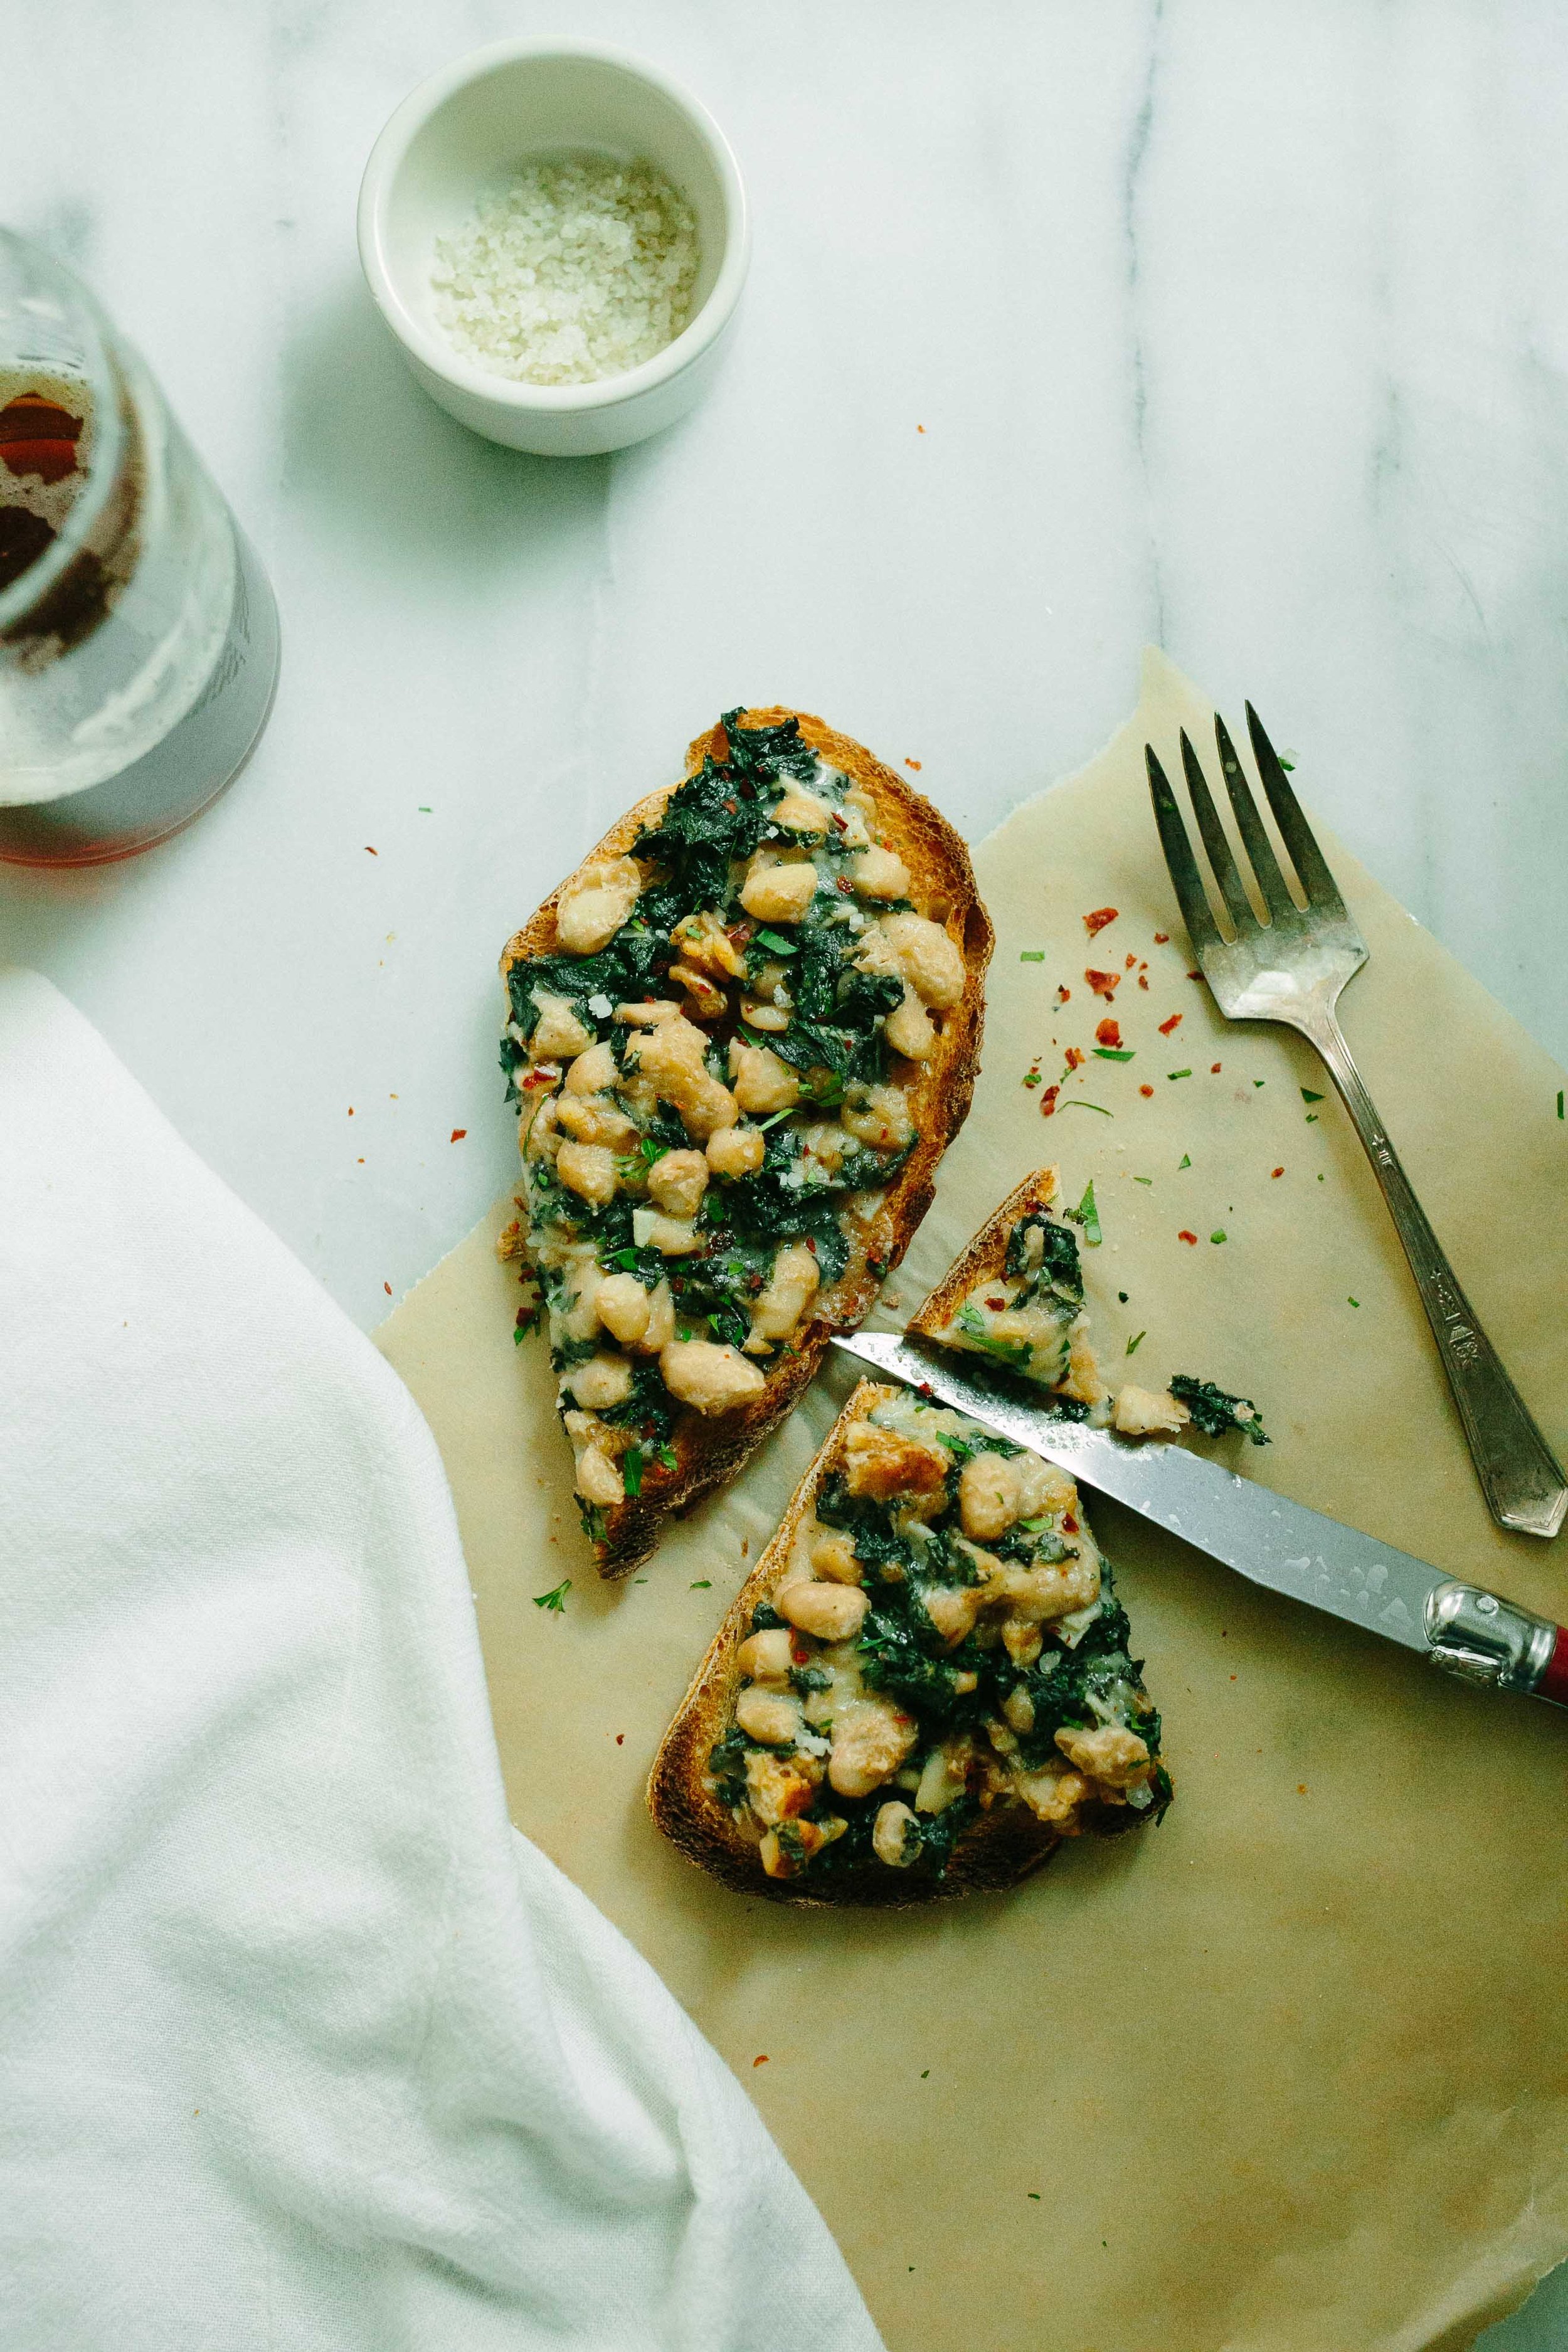
The white beans and kale are not key for Welsh rarebit, but they are key for this West Coast rarebit and give you something a little vegetal to help cut through the richness that is the month of December. I also replaced the butter/cream/egg yolks with creme fraîche, which still gives you some needed lipid power albeit in a slightly tangier and lighter form. If you need a legit rarebit recipe, Munchies has you covered, as does the Guardian. You could also use whatever vegetables you have lying around instead of the kale and beans, because few things suck when you smother them in garlic and cheese and beer and get them all bubbly and hot under the broiler.

Toast the bread until barely golden brown on both sides, and set aside while making the rarebit mixture.

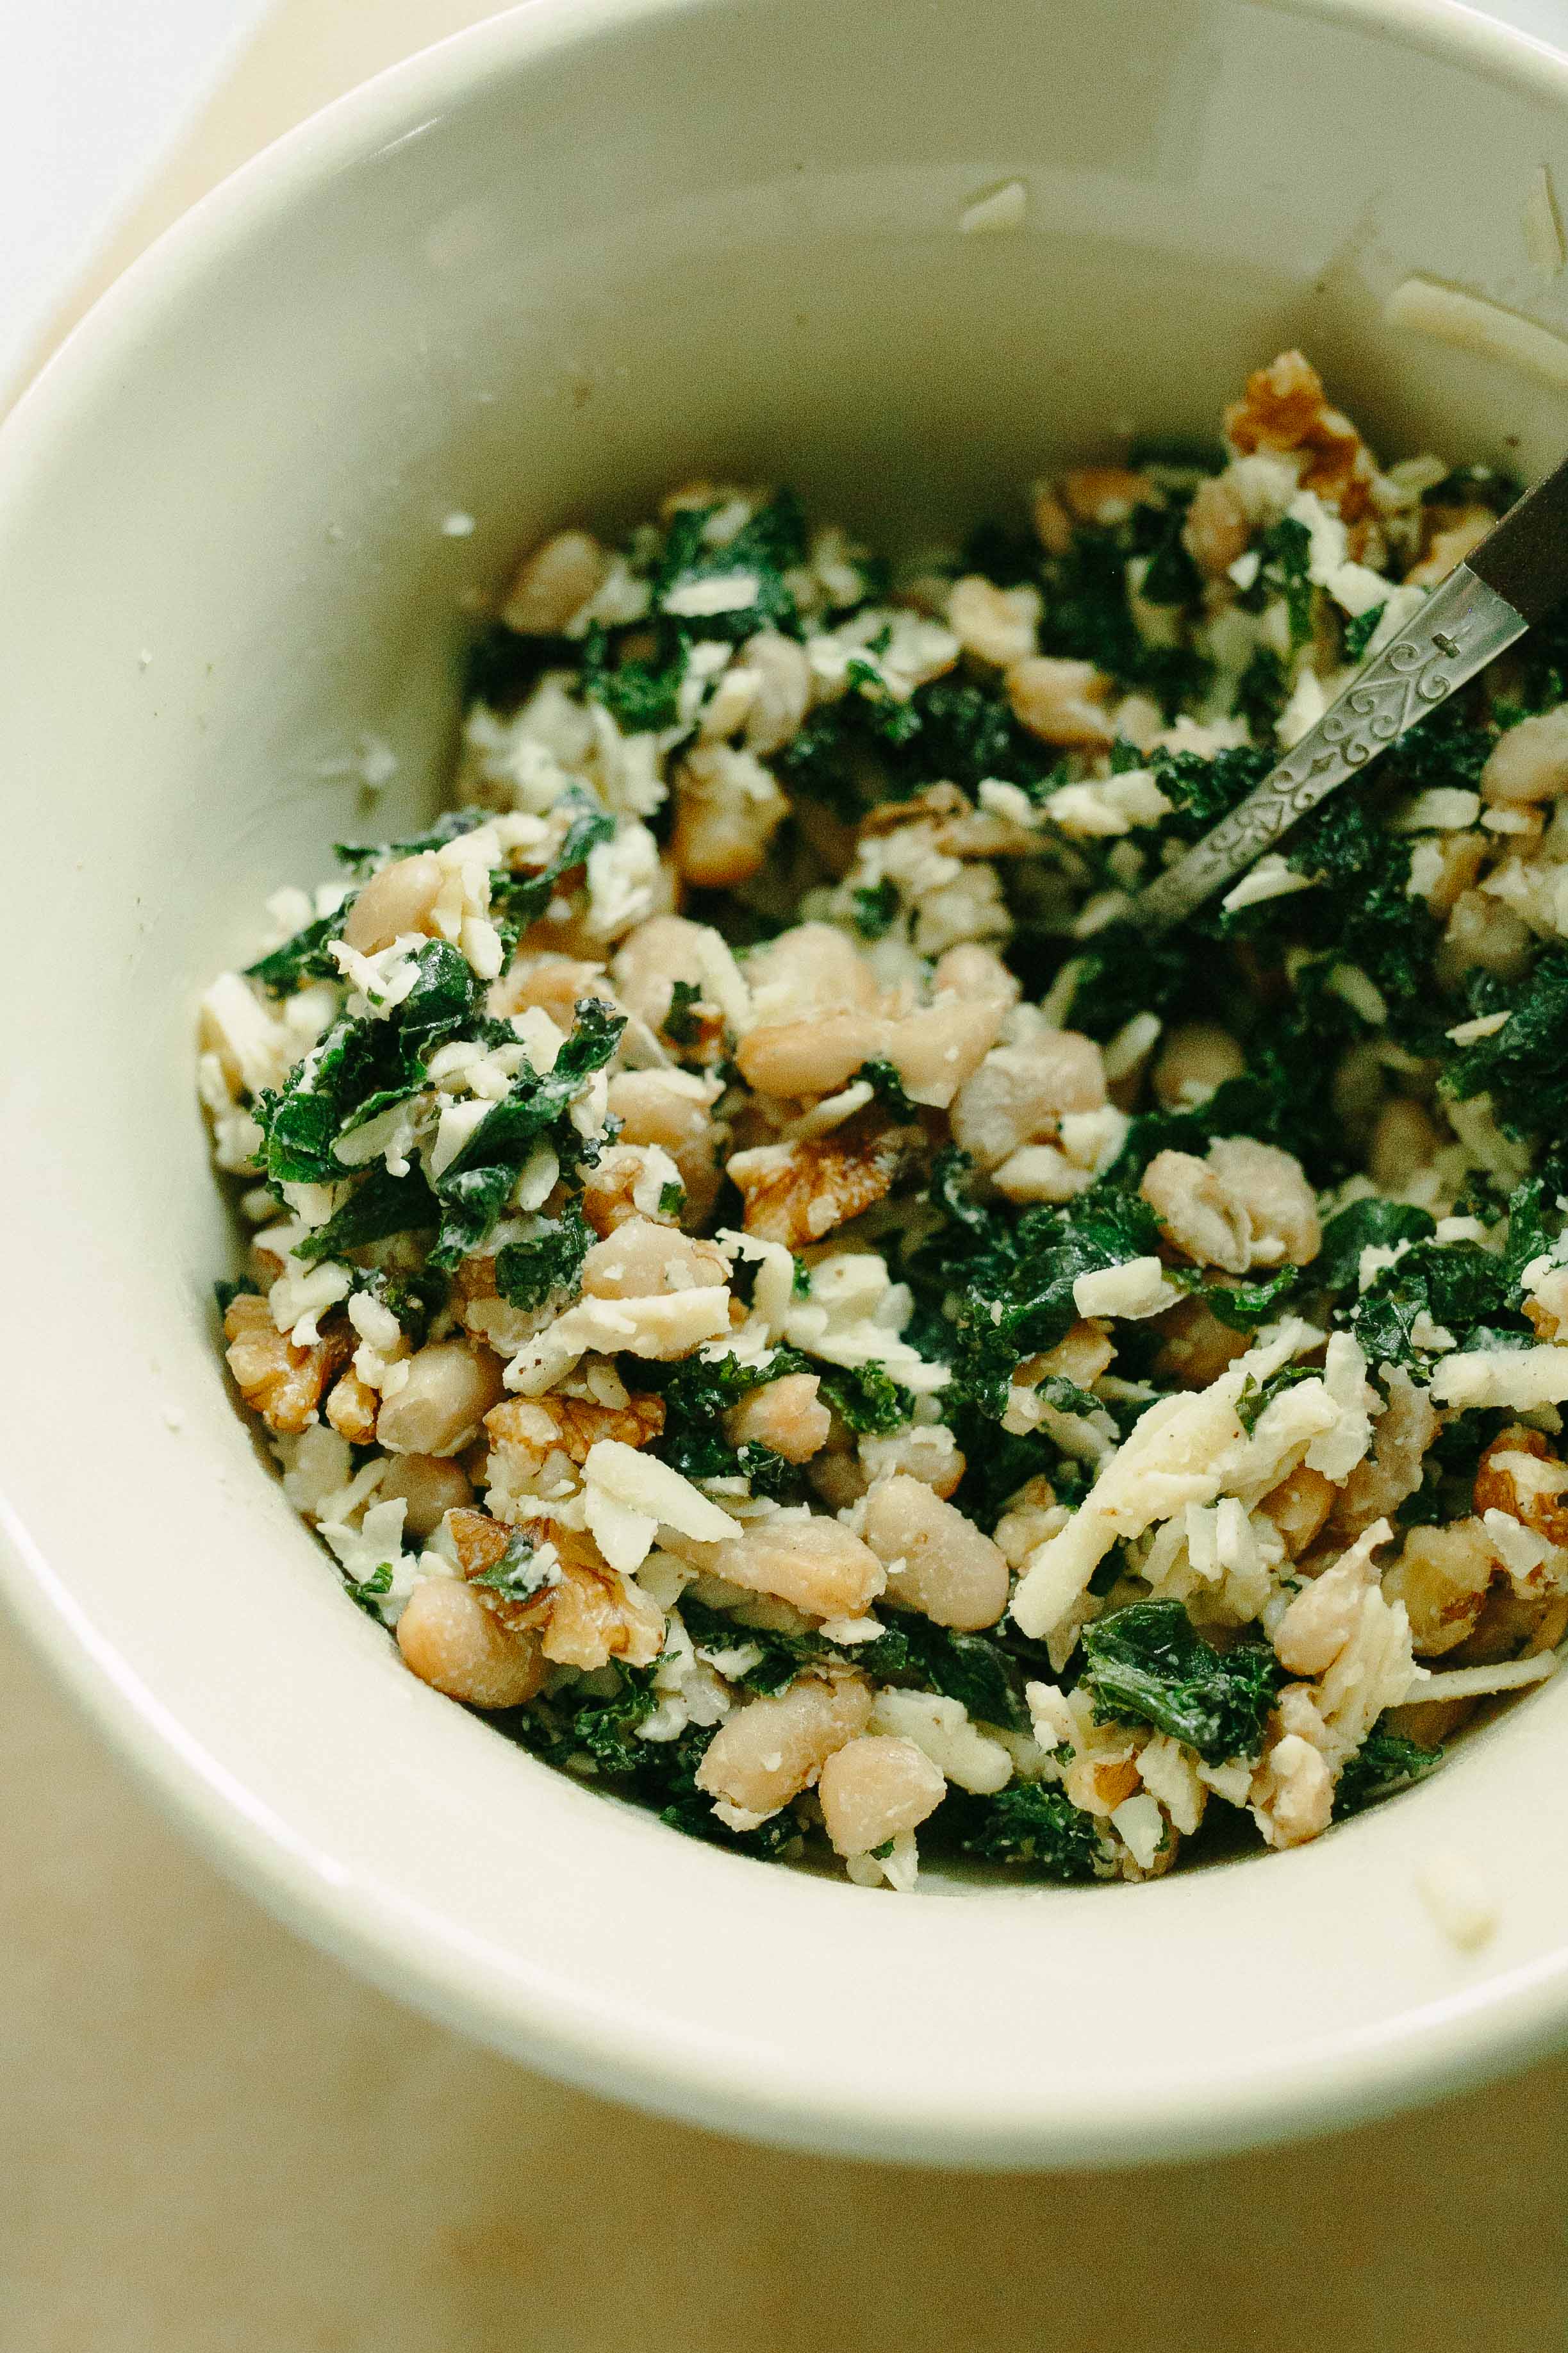
Heat the olive oil in a heavy-bottomed skillet over medium heat, and add the white beans in a single layer. Cook until the beans are beginning to get golden brown, stirring occasionally. Once most of the beans are golden in spots, add the kale to the pan and cook, stirring frequently, until the kale is wilted and tender, about 5 minutes. Remove from the heat and let cool.

While the beans and kale cool, preheat your broiler on the high setting, or your oven to 450˚F.

In a medium bowl, combine the creme fraiche, garlic, a hefty pinch of kosher salt, the dry mustard powder, and the Piment d'Espelette. Add the walnuts and cheddar cheese, followed by the cooled beans and kale, and stir to combine. Pour the beer over the mixture, beginning with 1/3 of the can and adding more if the mixture seems dry.

Place the toasts on a baking sheet and divide the mixture evenly among them, spreading it out over each toast in an even layer. Broil or bake until the mixture is bubbly and turning golden, about 4-8 minutes (depending on whether you have a broiler drawer, or are broiling or baking it in the oven, which puts the toast a bit farther from the heating element). Sprinkle with flaky salt, pepper flakes, and chopped parsley, and serve immediately.


4 1/3-inch thick slices of bread (I used sourdough)
1-2 tablespoons olive oil
1 can white beans (such as cannellini, drained and rinsed
1/2 bunch green or Red Russian kale, washed, stemmed and finely chopped (but not minced)
2 tablespoons creme fraiche
2 cloves garlic, minced
kosher salt
1/2 teaspoon dry mustard powder
1/8-1/4 teaspoon Piment d'Espelette or cayenne pepper (I used 1/8 teaspoon and topped the finished rarebit with more pepper flakes)
1/2 cup walnuts, coarsely chopped
1 1/2 cups grated cheddar cheese, preferably an aged/extra sharp variety
1/3-1/2 can beer of your choice (I used a lager, though stout is common in traditional recipes)
flaky salt
pepper flakes (optional)
freshly chopped parsley (optional, but nice for color)


ricotta tartines with peaches, basil, and piment d'espelette

autumn, breads, breakfast, desserts, snacks, summer, sweet, vegetarianFieldandForest2 Comments
4j5a77861.jpg

I don't know about you, but I have jumped hardcore onto the ricotta toast bandwagon. It is SO good! Why is it so good? Why can I not stop myself from eating ricotta toast? Seriously. After I took the above photo, I ate those two tartines, and then I wanted more, so I made two more. And then I ate those. And I am seriously considering toasting up some more bread and making another. Somebody come save me from myself, please! I will repay you with a tartine. And then someone else will probably have to come save you from eating tartines at some point, too, and if the cycle continues, we will have so many people at our place eating tartines, which means at that point we'll just have to have a party.

Which works out, since it's FRIDAY (yay!).

Happy weekend, all!

Ricotta Tartines with Peaches, Basil, and Piment D'Espelette
makes 4 tartines

Why call this a tartine? Tartines are often substantial, open-faced sandwiches, and are frequently eaten with knives and forks. The peaches here are cut into rather thick wedges, and the moisture from the ricotta can make the center of your toast a little soft, so these lack some of the structural integrity needed to lift the bread to your mouth (and are a little tall for you to take a bite directly out of one, anyway) and are best eaten with utensils. Hence, tartines! Shrink these down and make them with toasted baguette slices if you want something that lends itself better to finger food.

4 1/2-inch slices of crusty white bread, such as sourdough or ciabatta (do not use a soft, sandwich bread, as it will get mushy)
olive oil1/2 cup ricotta (whole or part-skim both work well)
1 ripe yellow peach, cut into 12 wedges (quarter the peach, and cut each quarter into thirds)
4 basil leaves sliced into chiffonade (ribbons)
honey, for drizzling (I used Tupelo honey, which I love as it is intensely floral and buttery, plus it never crystalizes) Piment d'Espelette, hot paprika, or a finely crushed dried red chile

Brush the bread with olive oil and toast under the broiler until browned and crispy (this happens quickly, so keep an eye on it as it toasts).

Spread about 2 tablespoons ricotta over each of the toasts. Lay three peach slices over each toast, and distribute the basil evenly among the toasts. Drizzle each tartine with about a teaspoon of honey (or more, if you prefer), and sprinkle with a small pinch of Piment d'Espelette. Serve immediately.

easie's refrigerator rolls

autumn, breads, spring, summer, vegetarian, winterFieldandForest3 Comments
4j5a1333.jpg

I can understand if you think we're all about the pancakes and bread and cookies and rolls in this house. (I'm looking at the past few weeks of posts myself and thinking, phoo, that's a lot of carbs!)  That's actually not the case, and I fully intended to give you a vegetable-rich dish this week, but I'm willing to risk a bread-heavy reputation in order to get you these rolls in time for Thanksgiving.

Easie's refrigerator roll recipe was gifted to my mom by a very generous friend, and they have since become the stuff of legend among members of our family.  They have been present at Thanksgiving every year for at least the past decade.  They are what I think of when I hear the word "cakebread;" the shortening and sugar make them tender and sweet, and they are light enough that you can eat 3 of them and still feel confident in your stomach's capacity for pie (and believe me, you will eat 3 of them). If you are curious about the shortening, I tried making them with butter and ended up with a tasty, but somewhat denser result.  So I would like to play a devil's advocate card and encourage you to use shortening if possible, especially if you're like us and will only make this recipe once a year.

If you defy the laws of the universe and end up with leftover rolls, send them to me (!!!) or enjoy them with butter and jam for the next morning's breakfast.

Easie's Refrigerator Rolls
Adapted from Tre's recipe - Makes 60 small rolls (cut with a 1 1/2 inch biscuit cutter)

A few dough-rising notes: the time the dough spends in the fridge makes it rise VERY slowly.  You may be confused or concerned in the apparent lack of yeast activity, and you're not alone.  As long as you know the yeast was alive after you added it to the milk, sugar, and flour (i.e. you saw it bubble up after a couple of hours), you should be in a good place with the dough.  Give yourself enough time to let the dough rise the day of your Thanksgiving dinner by taking it out of the fridge when you wake up in the morning.  It can hang out for a few hours while you prep other dishes before it needs to be rolled out and cut.

2 cups milk
1/2 cup sugar
1/2 cup Crisco
1 package active dry yeast (2 1/2 teaspoons)
About 6 cups flour
1 teaspoon salt
1 heaping teaspoon baking powder
1/2 teaspoon baking soda

In a saucepan over medium-low heat, gently heat milk, sugar and Crisco just until Crisco melts, stirring occasionally.  Set aside to cool to 105-110 degrees F (if you don't have a thermometer, cool until it is barely warmer than room temperature).  Once cooled, add 1 package yeast to the mixture and stir to dissolve.  Add enough flour to make a thick batter (about 2 cups flour), and transfer the mixture to a large bowl.  Cover and let stand in a warm place for 2 hours; it should begin to rise and bubble.

In a medium bowl, whisk together the salt, baking powder, baking soda, and 3 1/2 cups of the remaining flour.  Add the flour mixture to the milk mixture and mix to combine.  It is not necessary to knead this dough, but bat it while adding the flour.  If the dough is wet or sticky, add the remaining 1/2 cup flour.  Place dough in refrigerator, covered, overnight.

Remove in the morning to bring up to room temperature (this will take 2-3 hours).  Roll out on floured board or wax paper.  Cut into rounds with a 1 1/2 inch biscuit cutter, and place on a parchment-lined baking sheet; space them according to how soft/browned you'd like them to be (1/2 inch apart for soft, light-colored sides, 1 inch or greater for more all-over browned rolls).  Cover and let rise in a warm place 2 1/2 hours.

While the rolls are rising, place a rack in the top third of your oven and preheat the oven to 400˚F.

Bake the rolls for 10-12 minutes, or until the tops are beginning to brown (placing the rolls closer to the top of the oven will encourage faster browning).  Place in a napkin lined basket or bowl to keep warm.  These rolls are best enjoyed the same day they're made.

wholegrain pumpkin buttermilk pancakes

autumn, breakfast, vegetarian, winterFieldandForest2 Comments

The biggest complaint that Richard has (according to him, in life) is that some things taste too much like baking powder. (I just asked him if he has other complaints and he said, "Oh, I'm sure I do, but that's... that's a big one.")  But it can be a let down when I find a recipe that looks amazing and then see that it contains more than two teaspoons of baking powder.  Would he really notice, you ask, if I just used the full amount?  Yes, yes he would.  If he were a drug-sniffing dog in an airport, he probably wouldn't be able to nail down a suitcase full of cocaine, but he would undoubtedly be able to tell if the blueberry muffin you bought at the Starbucks in Terminal B was made with baking powder.  It is a gift.

This was kind of discouraging for me for a while, but I've recently taken to it as a challenge.  I don't really want baking powder to be a dominant flavor in a baked good, would you?  And luckily a fair number of pancake recipes which call for a lot of baking powder can be modified in various ways without compromising lift and fluffiness.  That's how I know these pancakes were a success: one, they were incredibly high and fluffy. Like, the fluffiest. Two, Richard took a bite and yelled "These don't taste like baking powder!" and proceeded to eat the rest of the pancakes left on my plate.  Luckily this recipe makes a crapload of pancakes, I think because I adapted it from the Pioneer Woman and her family of six (or more?) who spend their days working on their ranch.  We are a family of two who spend our days working at our desks, so needless to say that many of these pancakes end up in the freezer for later.

In case you're wondering what I changed about the pancakes, I'll tell you; I cut out a full tablespoon of baking powder, and replaced it with 1 1/2 teaspoon of baking soda (I think that Richard is sensitive to the flavor of cream of tartar, which is usually the weak acid ingredient in baking soda).  I then changed out the milk in the recipe for buttermilk, which is acidic and reacted with the increased proportion of sodium bicarbonate (which is what baking soda is) to create CO2 and additional rise in the pancakes.  While the resulting pancakes were incredibly fluffy, they were SO tall that they actually took a while to cook.  If you're willing to compromise pancake height for the sake of speed, I might cut out the additional baking soda all together and just use a tablespoon of baking powder total.  I'd still use buttermilk for at least part of the liquid, though, because when is adding buttermilk to pancakes a bad idea?  Never, that's when.


Wholegrain Pumpkin Buttermilk Pancakes
makes 24-30 pancakes, serves 4-6

Dry ingredients:
2 cups spelt, kamut, or all-purpose flour
1 cup whole-wheat pastry flour
1 tablespoon baking powder
1 1/2 teaspoons baking soda
1/4 teaspoon freshly ground nutmeg
1/2 teaspoon cinnamon
1/2 teaspoon kosher salt

Wet Ingredients:
2 cups pumpkin puree
2 eggs
2 1/2 cups liquid (use all buttermilk, all whole milk, or a half-and-half mixture)
3 tablespoons maple syrup
2 tablespoons butter, melted

To serve:
butter
maple syrup
pomegranate arils (optional, but pretty!)
toasted pecans (optional, but tasty!)

Combine the dry ingredients in a medium bowl, and whisk to thoroughly combine.  Combine the wet ingredients in a large bowl, and whisk to thoroughly combine.  Add the dry ingredients to the wet ingredients (this is to prevent pockets of dry ingredients from hanging out at the bottom of your bowl unbeknownst to you), and whisk gently to just combine (over-mixing can develop gluten in the flour and create tougher pancakes).  Switch the whisk for a spatula and fold the mixture a few times, making sure that there are no pockets of dry ingredients hiding in your batter.

Place a cast iron skillet or griddle over medium heat.  Test the heat of the pan by wetting your fingers under the faucet and flicking a few drops of water onto the pan's surface.  If the drops appear to fizzle and dance on the surface, your pan is hot and ready.  Smear a little butter in the pan with a spatula, and drop dollops of batter (a dollop for me was a little less than 1/4 cup of batter) on the skillet, making sure to give them a little room to spread.  Cook for 2-4 minutes on the first side, then flip, continuing to cook the pancakes for another minute or two before removing them to plates.  You can hold cooked pancakes in a low oven (200˚F) while you finish the rest of the batter, if you like.  Refrigerate or freeze leftovers for future breakfasts (just heat them in a dry pan or nuke them for a minute before eating, or if you're my sister, just enjoy them frozen).