FIELD & FOREST

breakfast

ricotta tartines with peaches, basil, and piment d'espelette

autumn, breads, breakfast, desserts, snacks, summer, sweet, vegetarianFieldandForest2 Comments
4j5a77861.jpg

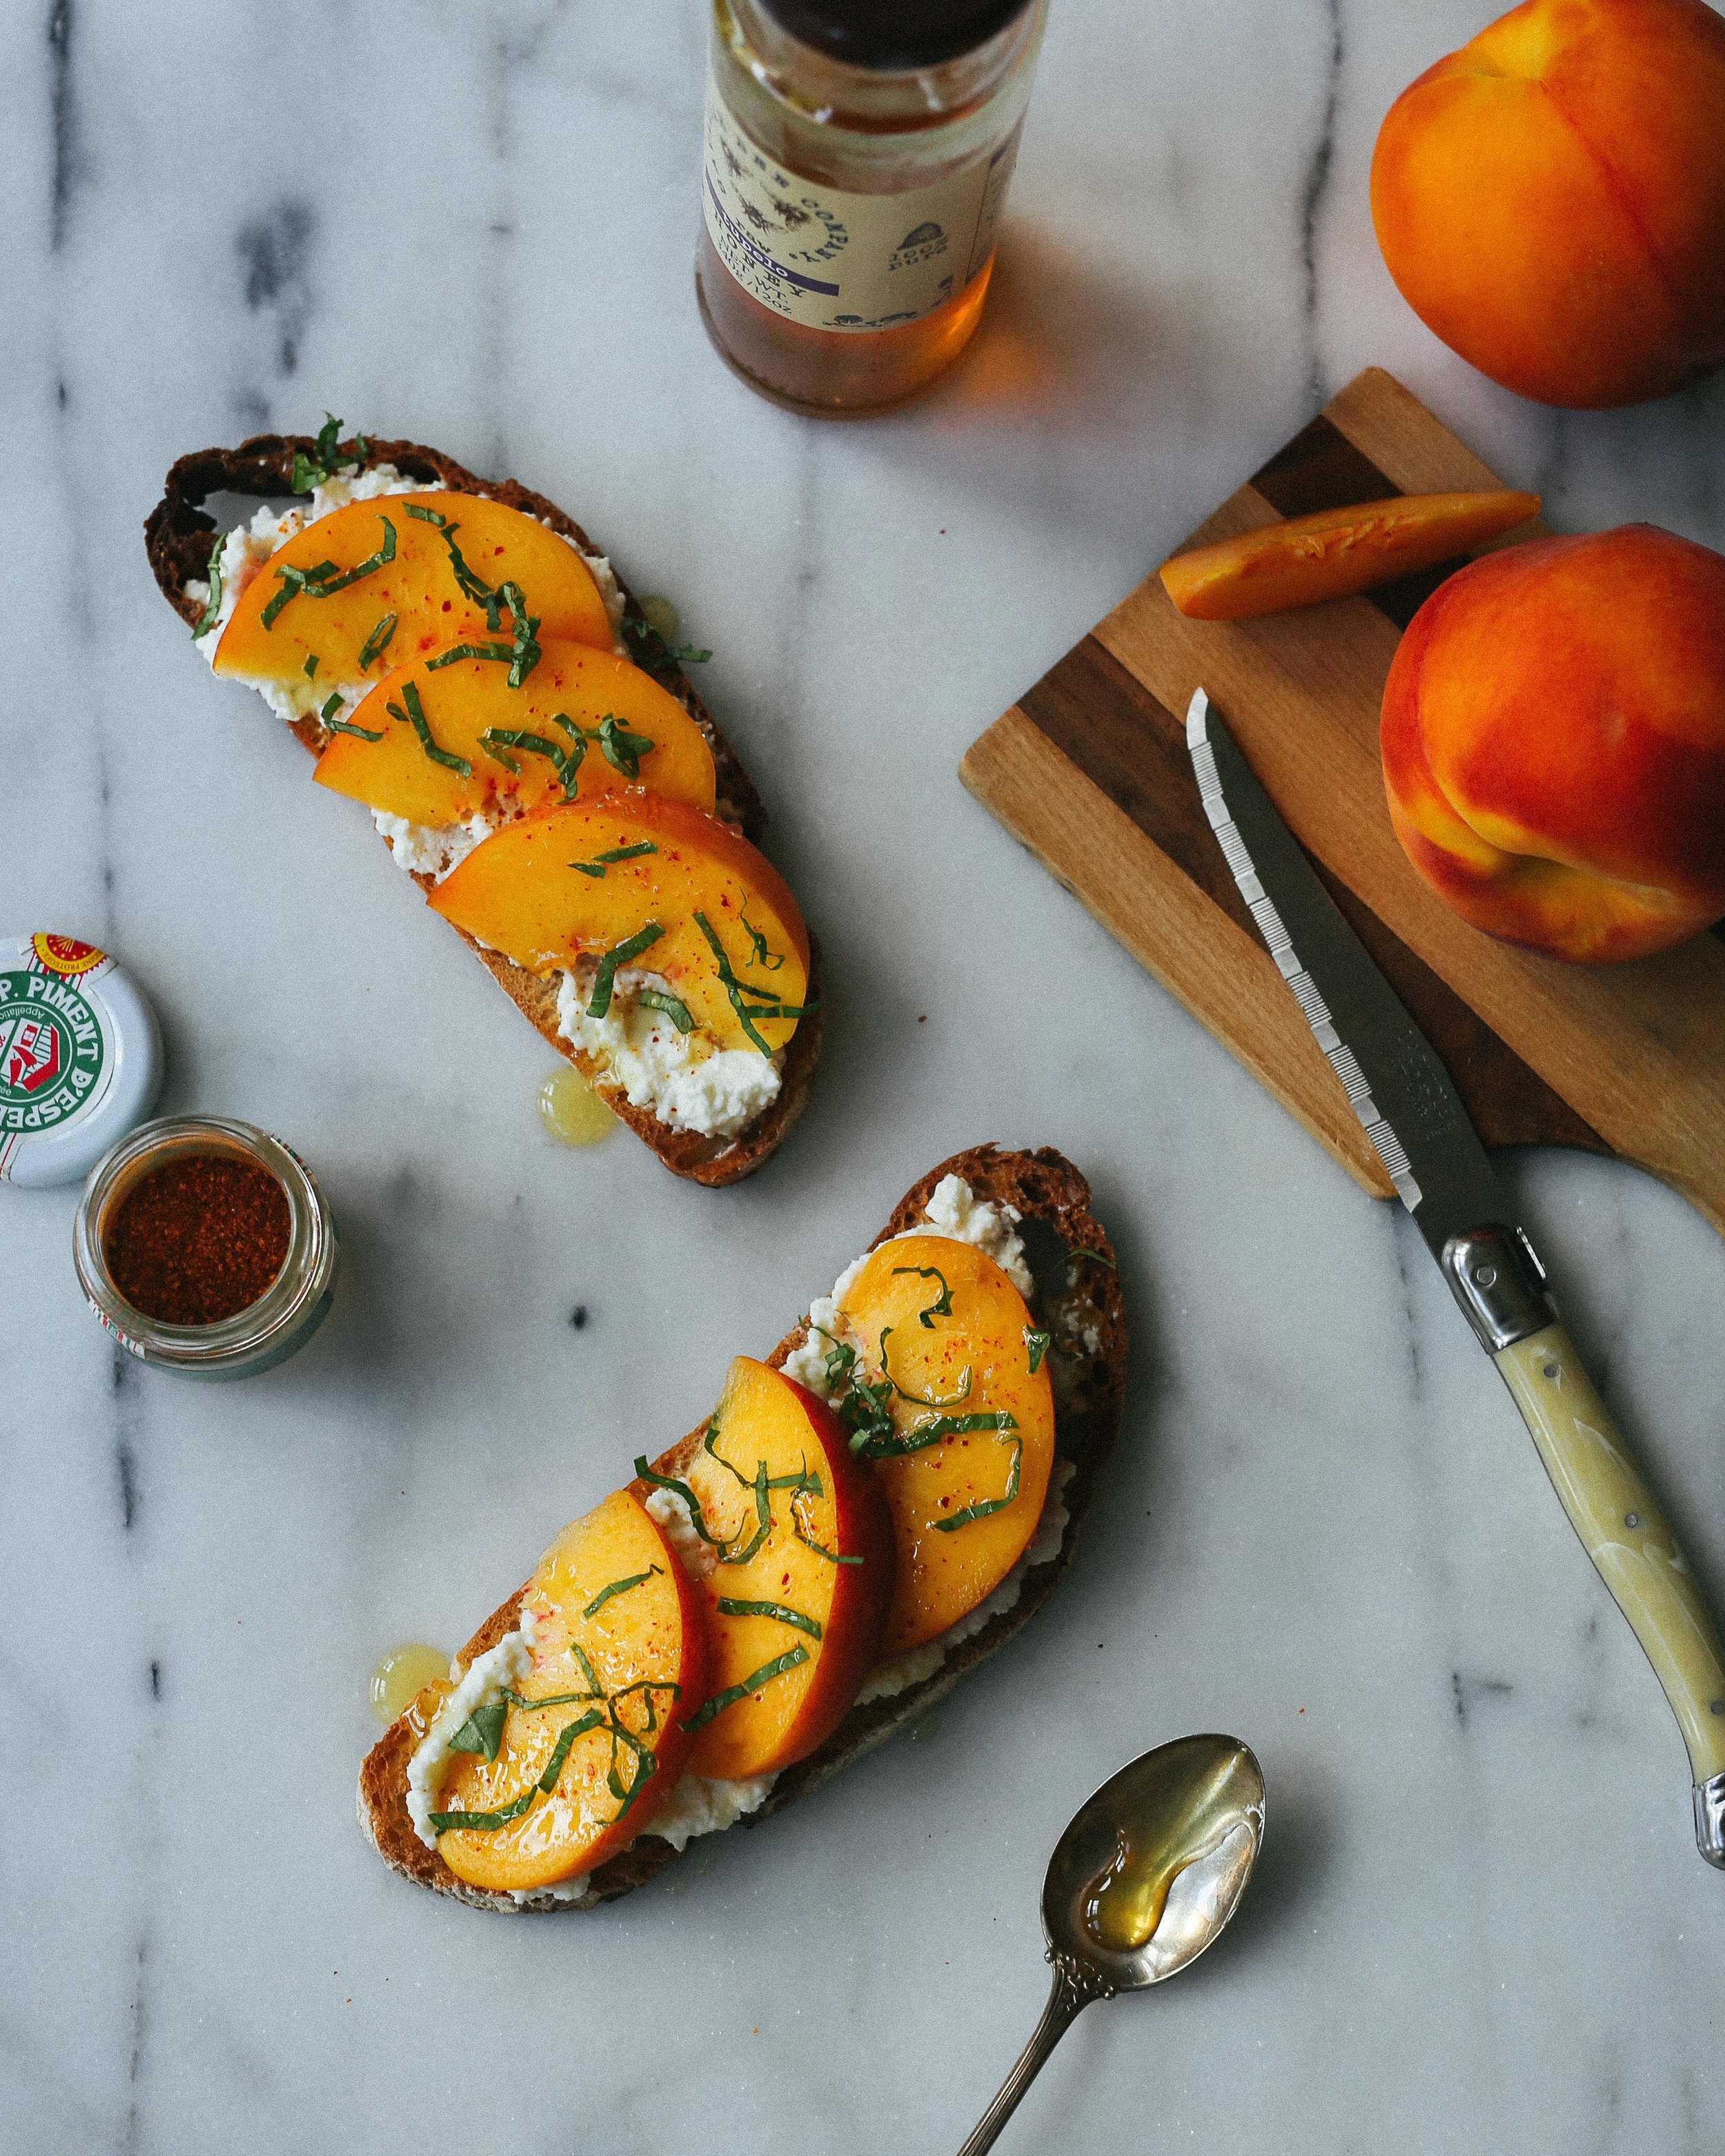
I don't know about you, but I have jumped hardcore onto the ricotta toast bandwagon. It is SO good! Why is it so good? Why can I not stop myself from eating ricotta toast? Seriously. After I took the above photo, I ate those two tartines, and then I wanted more, so I made two more. And then I ate those. And I am seriously considering toasting up some more bread and making another. Somebody come save me from myself, please! I will repay you with a tartine. And then someone else will probably have to come save you from eating tartines at some point, too, and if the cycle continues, we will have so many people at our place eating tartines, which means at that point we'll just have to have a party.

Which works out, since it's FRIDAY (yay!).

Happy weekend, all!

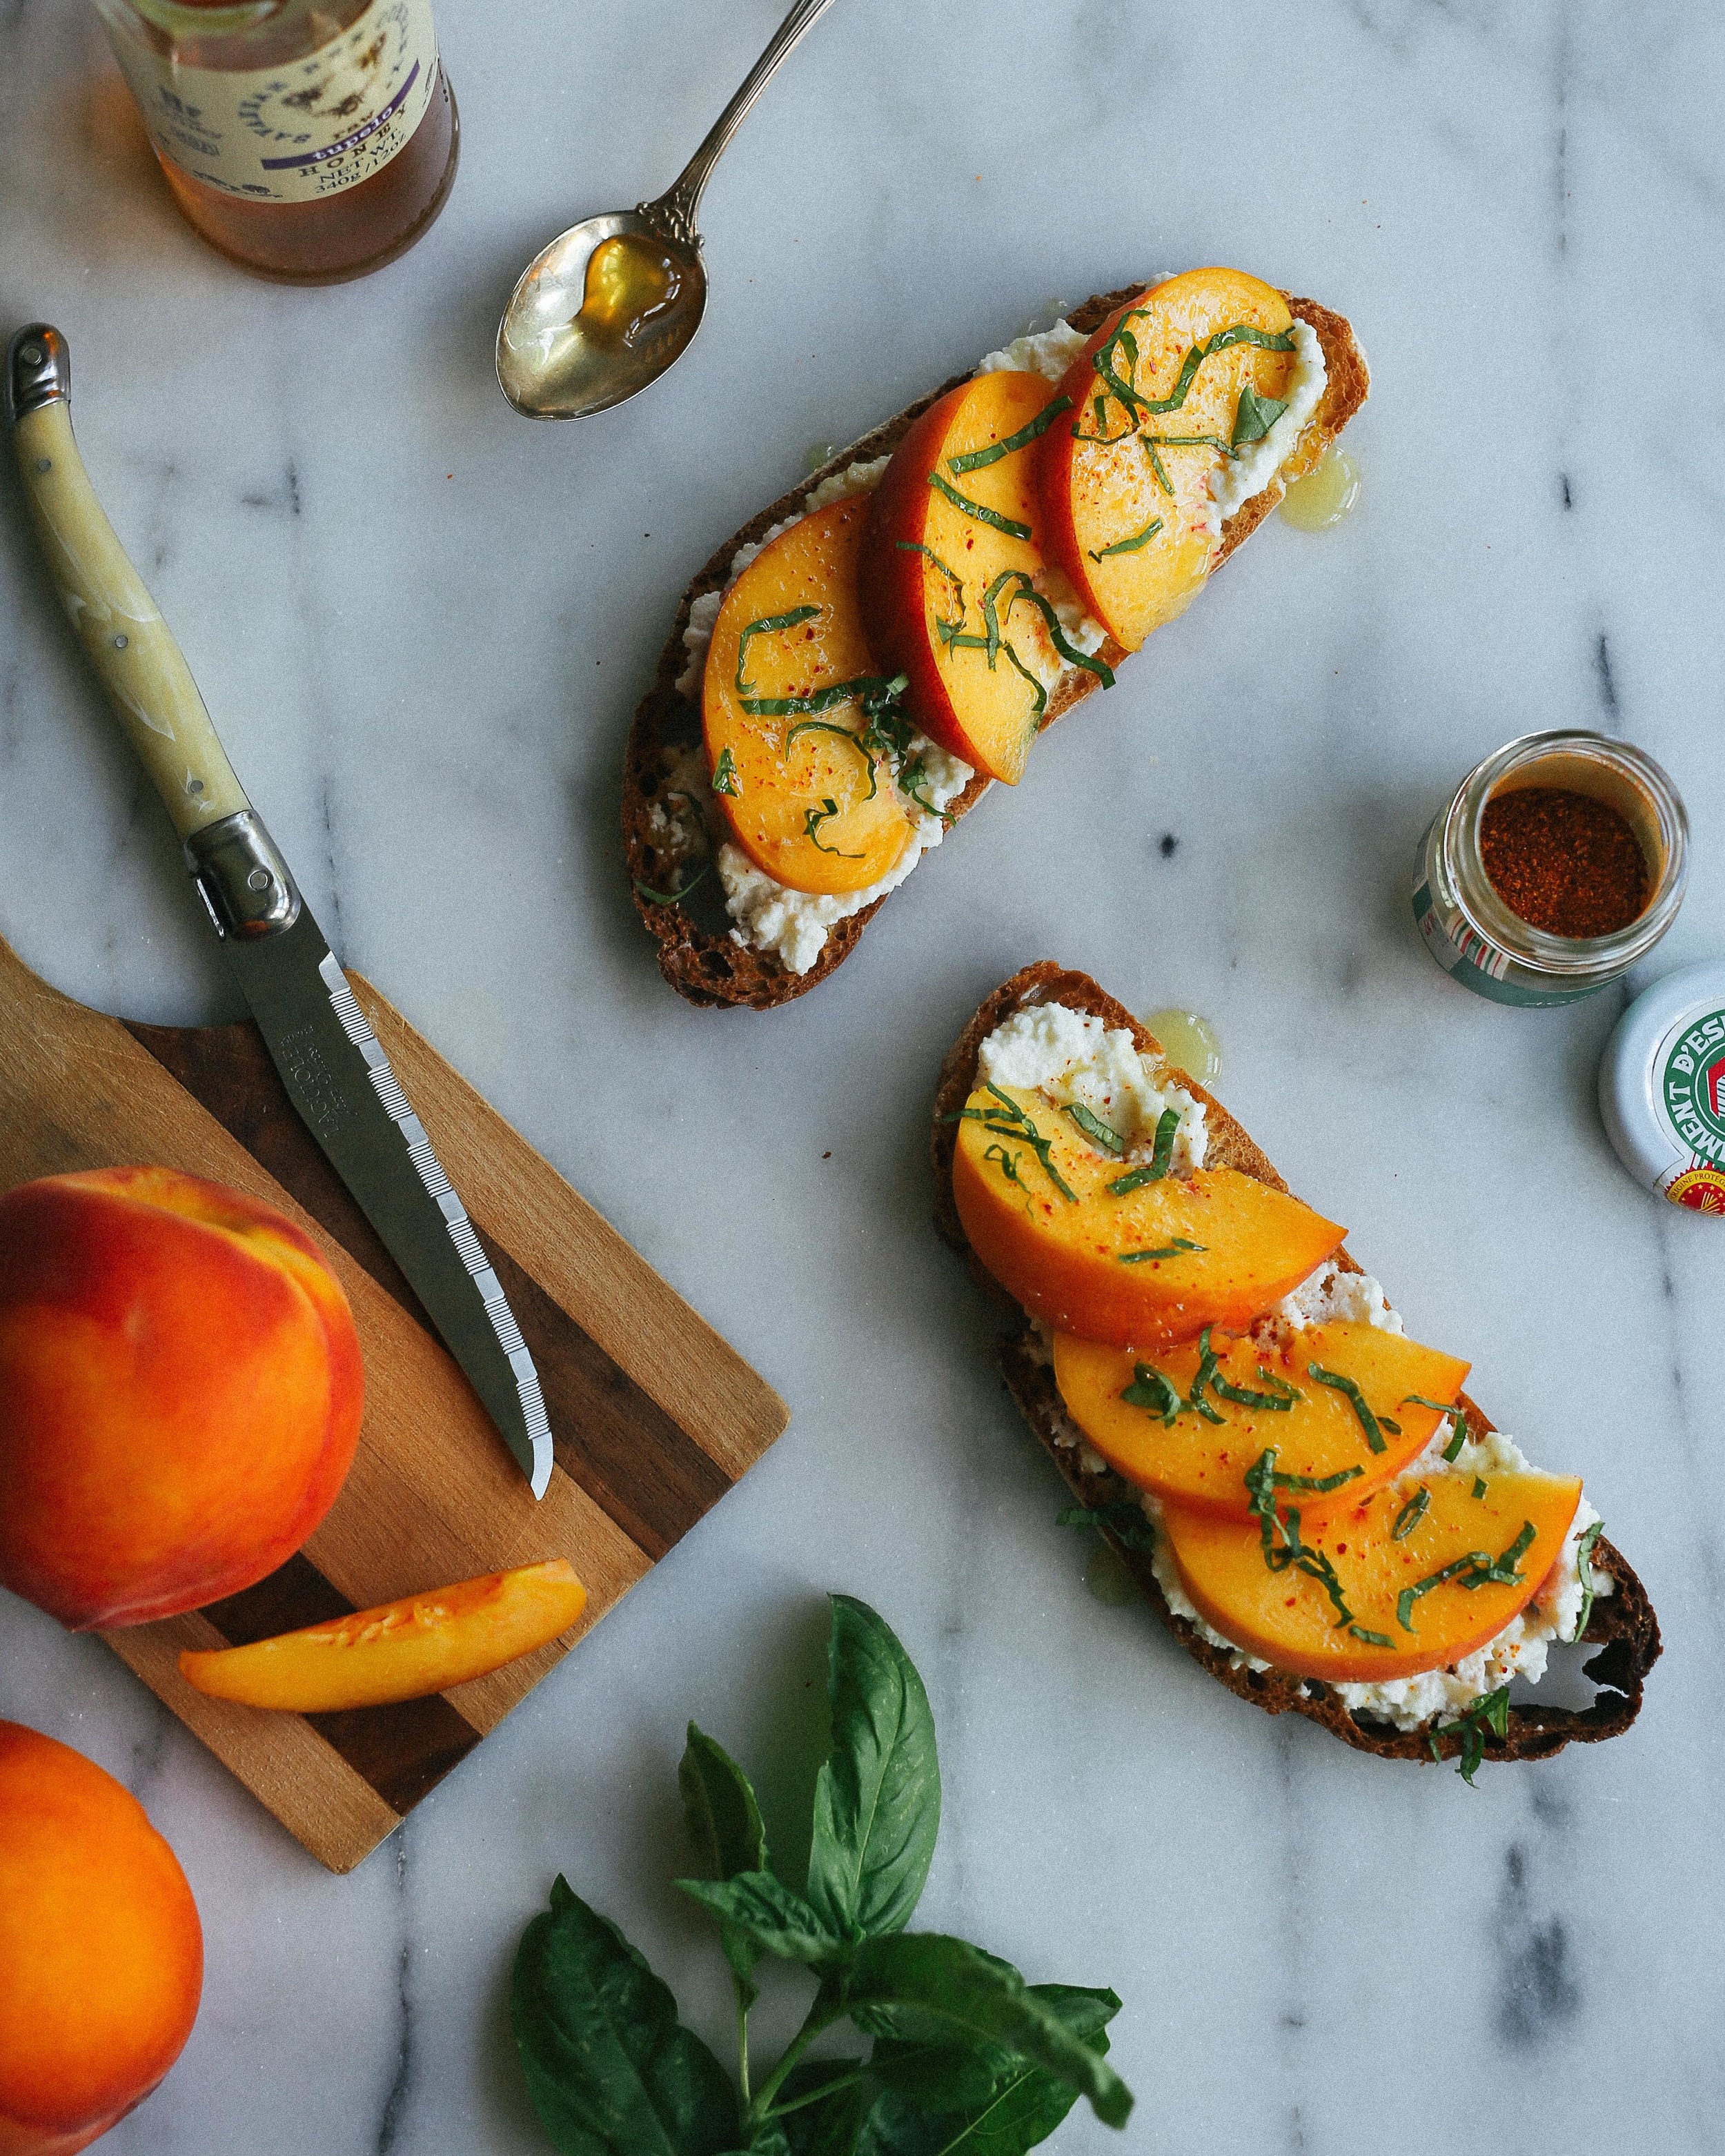
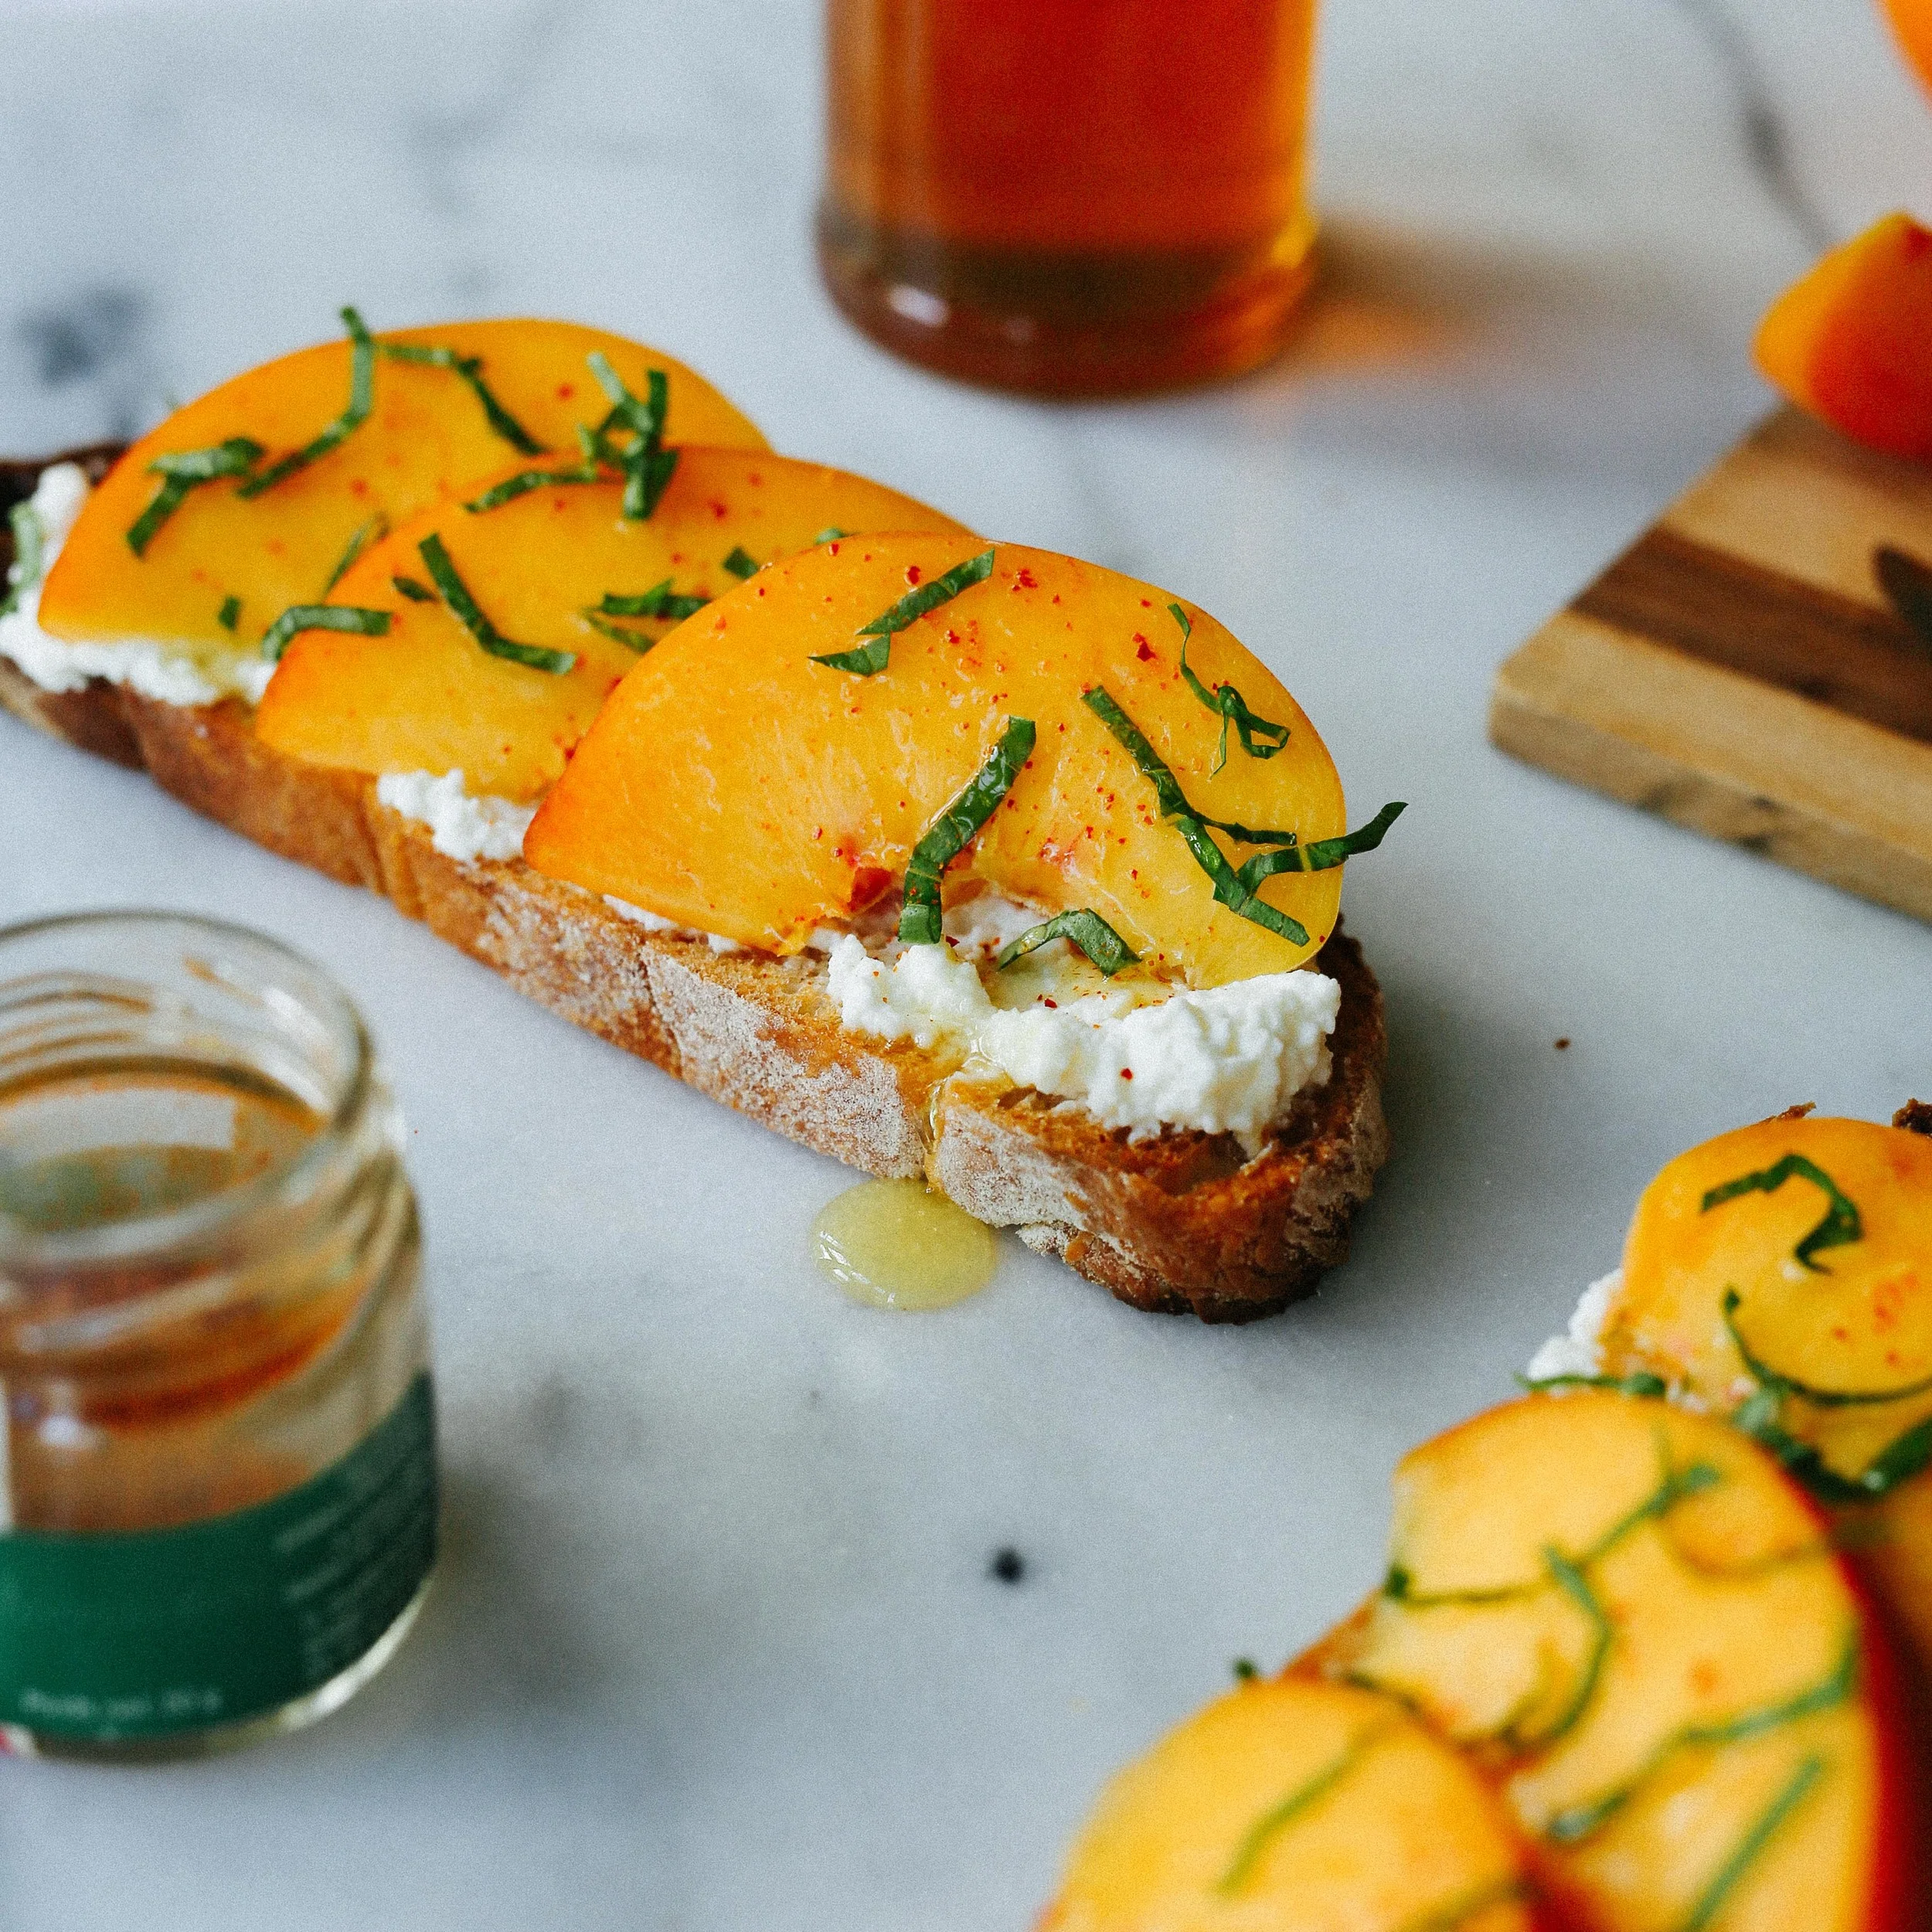
Ricotta Tartines with Peaches, Basil, and Piment D'Espelette
makes 4 tartines

Why call this a tartine? Tartines are often substantial, open-faced sandwiches, and are frequently eaten with knives and forks. The peaches here are cut into rather thick wedges, and the moisture from the ricotta can make the center of your toast a little soft, so these lack some of the structural integrity needed to lift the bread to your mouth (and are a little tall for you to take a bite directly out of one, anyway) and are best eaten with utensils. Hence, tartines! Shrink these down and make them with toasted baguette slices if you want something that lends itself better to finger food.

4 1/2-inch slices of crusty white bread, such as sourdough or ciabatta (do not use a soft, sandwich bread, as it will get mushy)
olive oil1/2 cup ricotta (whole or part-skim both work well)
1 ripe yellow peach, cut into 12 wedges (quarter the peach, and cut each quarter into thirds)
4 basil leaves sliced into chiffonade (ribbons)
honey, for drizzling (I used Tupelo honey, which I love as it is intensely floral and buttery, plus it never crystalizes) Piment d'Espelette, hot paprika, or a finely crushed dried red chile

Brush the bread with olive oil and toast under the broiler until browned and crispy (this happens quickly, so keep an eye on it as it toasts).

Spread about 2 tablespoons ricotta over each of the toasts. Lay three peach slices over each toast, and distribute the basil evenly among the toasts. Drizzle each tartine with about a teaspoon of honey (or more, if you prefer), and sprinkle with a small pinch of Piment d'Espelette. Serve immediately.

campfire blueberry cobbler

breakfast, desserts, summer, sweet, vegetarianFieldandForest4 Comments

I wish I could tell you that this camping trip was all sunshine and climbing and cobbler, and it was, but it was also mosquitos (in a BIG way) and now I am a human-shaped pile of itch. Our lovely, perfect, secluded BLM camping site, with its flat, soft ground, makeshift fire pit, and expansive field and mountain views, was also the site for mosquito Bonnaroo Summer 2015, and we were Mumford and Sons caught without our chicken suit and wedding dress. Not a moment had passed since we opened the car doors before we were enveloped in a wispy, humming cloud of bloodsuckers, more at a single time than I have ever before seen in my life.

Ohhh, I wish I were kidding.

Lucca, of course, couldn't have cared less about the mosquitos, and Richard is a particular breed of hardcore, so the two of them went about doing their various camp arrival activities (rolling in deer poop/setting up the tent, respectively), while I ran around the campsite in my ski jacket waving my arms and yelling and trying desperately to avoid being bitten. I was unsuccessful. But eventually a slight breeze picked up and the temperatures dropped and the majority of the mosquitos hurried away to wherever it is mosquitos go when it gets windy and cold, and we had a very lovely time eating burritos and drinking beer/wine and enjoying one of the best campfire desserts we've ever made.

So, here's the thing: I honestly don't know whether to call this a crumble or a cobbler, as there is no liquid in the topping (which I think is supposed to make it ineligible to be a true cobbler), but there was a definite cakey layer under the crispy, pebbled top which seemed out of place for a crumble. And the recipe I adapted was originally from a topping for fruit crisp, but I'm pretty sure that a crisp isn't supposed to be cakey at all. So, even though I'm categorizing this as a cobbler, I don't know what to call this Franken-fruit dessert! But it was delicious, whatever it was. And if you are someone who oscillates between a preference for cakey things and crumbly/streusel-y things, then this is definitely the happy medium you've been waiting to find.

As we were unable to finish the cobbler between the two of us that evening, we just stuck the lid on the Dutch oven when we were finished and ate the leftovers over yogurt for breakfast the next morning. I HIGHLY recommend you do this as well, should you find yourself with leftovers of your own.

A few things you might be wondering/thinking:

Where are you in these photos? We were in the Uintas, a northern Utah mountain range, and the largest mountain range running east-to-west in the contiguous United States. It includes King's Peak, the highest mountain in Utah at 13,528 feet, plus over 1,000 lakes (really, really). It is a great place to hike, camp, ski, paddleboard, kayak, play with dogs, and escape the oppressive summer heat of the Salt Lake valley. It is also barely two hours away from downtown SLC! Even though we camped on BLM land, there are a number of (very popular) campsites in the area. You can check out campsites, permit/pass information, weather forecasts, and more here.

Where did you get that nifty Dutch oven? Richard got this Dutch oven from his parents for a past birthday. It is aluminum, and is light enough to take backpacking. If you're more into cast iron, Lodge makes a number of great Dutch ovens in a variety of sizes and styles that would be perfect for car camping. Make sure you get one with a handle that can swing up and over the lid of the Dutch oven for easy lifting and moving, or you are going to have a pretty interesting time maneuvering your lava-hot pot of cobbler out of the campfire.

How did you keep Lucca from running away from your campsite? Oh, there was definitely a moment when Lucca went on a mission to befriend a lone landscape photographer, and Richard had to hunt him down in the semi-darkness. And Lucca took himself on a short adventure to somewhere (I still don't know where) when I got up for an early morning pee, and I hollered for him for a good couple of minutes before he popped out of some bushes on the other side of the field next to our campsite. So, I suppose the answer is: we don't. He kind of likes to explore on his own when we're outside, and he almost always returns without our intervention. I guess I don't really have good advice, other than that we give him a few top-shelf treats and some cheese every once in a while (usually when he returns from adventuring), and I think he intuits that he'd be hard-pressed to find aged cheddar elsewhere in the wilderness.

(And don't you worry, Internet trolls, we wouldn't let him off the leash if he was a menace to other dogs/small children, and we leash him when we're in areas with a high-density of wild animals/cars/other people/watersheds.)

You left some stems on your blueberries when you made the cobbler!! Let's be clear that when you are getting attacked by hordes of mosquitos, de-stemming blueberries falls pretty low on your list of priorities. I just wanted to get the cobbler show on the road as quickly as possible. But to be honest, I didn't even notice any stems in the cobbler after it was finished! True story.

I want to know what's happening with that burrito-looking thing. Yeah! So we had a leftover chicken breast from the Gringo Chicken Tacos (I made a double batch the other day), so I shredded it and added it to some black beans which we heated on the camp stove. We put the chicken-bean mixture on whole-wheat tortillas, added some leftover chopped onions and cilantro, store-bought pico de gallo, and avocado slices, plus a squeeze of lime, and rolled everything up into burritos. They rocked.

Campfire Blueberry Cobbler serves 4-6 (or 2 with leftovers for breakfast)

For the topping:
1 cup all-purpose flour
1/3 cup packed brown sugar
1 tablespoon white sugar
1/4-1/2 teaspoon cinnamon (depending on how cinnamon-y you like your topping)
1 large pinch kosher salt (1/8 teaspoon)

Before you leave on your camping trip, combine all of the dry ingredients in a lidded container (preferably one that is large enough to also cut the butter into) and mix thoroughly. Pack with the rest of your food for the trip.

To complete your cobbler:
6 tablespoons butter, divided
4-6 cups blueberries (depending on how your preferred fruit-to-topping ratio... we used about 4 cups of berries)
1-2 tablespoons brown sugar juice of 1 lemon

Equipment: one 10-inch Dutch oven, a knife, a campfire with hot coals, tongs

Grease the inside of a 10-inch Dutch oven with 1 tablespoon of the butter. Add the blueberries, brown sugar, and lemon juice to the Dutch oven and mix with your hands to combine.

Cut the remaining 5 tablespoons butter into the container with the dry topping mixture. Use your fingers to pinch the butter into the flour mixture until the mixture looks like a blend of sand and small pebbles. Spread this mixture evenly over the blueberries, and place the lid on the Dutch oven.

Spread a single layer of hot coals on one side of your campfire, and place the Dutch oven over the coals. Use the tongs to carefully place about 10 additional coals (12, if your coals are on the small side) on the top of the Dutch oven. Cook for 30-40 minutes, rotating the Dutch oven 90-180 degrees every 5-10 minutes so the cobbler cooks evenly.

Remove the Dutch oven to a bare patch of dirt, and carefully use the tongs to place the coals from the lid back into the fire. Remove the lid from the Dutch oven to make sure that the cobbler is cooked, and let cool with the lid off (or ajar, if it is buggy) for about 5 minutes before serving.

baked oatmeal with apples, rhubarb, almonds, and pepitas

autumn, breakfast, desserts, spring, sweet, winterFieldandForest2 Comments
4j5a5904.jpg

I know, I know... what, pray-tell, is this apple and nut-crumbly topped thing doing here in May. Would you believe that the Northern Utah high desert, land of the fourteen-day spring, has developed a Seattle-esque languor of thunderstorms and wind? That we've been slathering on sunscreen in the morning only to throw on our rain shells and boots in the afternoon (or vice versa)? That I haven't had to water my garden once in the past week and a half? That the ski resorts have closed for the season even though we've had an additional 16 inches of snow in the mountains in past 72 hours?

It is crazy-town.

But it's reinvigorated our desire for baked and braised and stick-to-your-ribs things for the time being, as we are feeling these feelings of homebody-ness and the need for thick socks and weekend mornings spent on the carpet with bowl food and Calvin & Hobbes anthologies. This oatmeal has been in the back of my mind since I received this book as a gift two years ago, and I am face-palming myself for not making it earlier. The original recipe calls for bananas and walnuts, but I'd encourage you to try this version while rhubarb is in season. It is like eating apple crumble and creme brulée and oatmeal all at the same time, and it has just enough cinnamon and nutmeg to make it feel warm and cozy even when eaten leftover straight out of the fridge.

Baked Oatmeal with Apples, Rhubarb, Almonds, and Pepitas
adapted from Heidi Swanson - serves 6 generously, or 12 as part of a larger brunch spread
This is the dream brunch dish, as you can prep the rhubarb compote the night before, and then easily prep the rest of the ingredients in the morning. Put it in the oven about a half-hour before the meal is slated to begin (it cooks for closer to 40 minutes, but in my experience people are generally a few minutes late to brunch), and it will fill your kitchen with all sorts of lovely smells before people arrive. I've given you proportions for an 8-inch by 8-inch baking dish, but you can easily 1 1/2 or double the recipe to suit your headcount or available baking dish size. I ended up 1 1/2-ing the recipe to fill my oval baking dish; if you do the same, aim for 5-6 apples instead of 3-4.

2 cups rolled oats (not instant oats)
1/2 cup pepitas (raw pumpkin seeds)
2 tablespoons flax seeds
2 tablespoons chia seeds
1/3 cup + 1 tablespoon natural cane sugar (granulated sugar), divided
1 1/2 teaspoons ground cinnamon
1/4 teaspoon freshly grated nutmeg
1 teaspoon aluminum-free baking powder
1/2 teaspoon kosher salt
2 cups milk
1 large egg
3 tablespoons unsalted butter, melted and cooled slightly
2 teaspoons pure vanilla extract
3-4 large apples (Fuji, Pippin and McIntosh apples will all keep their shape when cooked) cored and cut into 1/2-inch thick wedges or slices
1 tablespoon fresh lemon juice
Rhubarb Compote (recipe follows)
1/3 cup sliced almonds
2 tablespoons chopped crystalized ginger, optional

To serve:
Yogurt
Fresh fruit or berries (blueberries, strawberries, or blackberries would all be delicious)

Preheat the oven to 375˚F/190˚C with a rack in the top third of the oven. Generously butter an 8-inch square baking dish, and set aside.

In a bowl, mix together the rolled oats, pepitas, flax seeds, chia seeds, 1/3 cup sugar, cinnamon, nutmeg, baking powder, and salt.

In another bowl, whisk together the milk, egg, half of the melted butter, and vanilla.

In a third bowl, combine the apple slices with the remaining tablespoon of sugar and the lemon juice, and toss to combine. Arrange the apples in the bottom of the buttered baking dish. Spoon the rhubarb compote over the apples (make sure it is distributed relatively evenly). Cover the fruit with the oat mixture. Slowly drizzle the milk-egg mixture over the oats, and gently give the baking dish a couple of thwacks on the counter so the milk evenly soaks the oats. Scatter the sliced almonds and the crystalized ginger, if using, across the top.

Bake for 35-45 minutes, or until the top is nicely golden and the oat mixture is set. Remove from the oven and set aside to cool for a few minutes. Drizzle the remaining melted butter over the top, and serve warm with yogurt and fresh fruit.

Rhubarb Compote (makes 1 1/2 cups)

2 cups sliced rhubarb (about 3-4 stalks)
1/4 cup sugar
a generous pinch of cinnamon

Combine the rhubarb, sugar, cinnamon, and a splash of water in a heavy-bottomed pot. Set the pot over low heat and bring to a simmer. Cook, stirring occasionally, until the rhubarb begins to break down and turns rosy in color, about 10 minutes, adding more water if necessary to keep it from burning on the bottom of the pan. Taste, and add more sugar if necessary (I like my compote slightly tart).

bittersweet chocolate things

autumn, breads, breakfast, desserts, spring, vegetarian, winterFieldandForest2 Comments

Zomg. You guys. YOU GUYS. Mrrgkjslkjglskfs.

I can't even write real words right now, I am so excited.

Because Cheese Board Chocolate Things. In Salt Lake City. In our kitchen. That came out of our oven. If you know what the Cheese Board is, then I know you're excited, too. If you don't know what the Cheese Board is, I hope you are at least intrigued by the sheer volume of chocolate folded into this ball of dough. If you know what the Cheese Board is, but you currently live in Berkeley and are thinking "Whatevs, I can get Chocolate Things whenever I want," then shut it. We don't want to hear about it.

(That's a lie, please tell us everything, because goodness knows we're dying over here without our zucchini-corn pizza and oatmeal scones.)

So anyway. What is this Cheese Board thing. Well, it is one of the many magical places in that mystical land known as the Gourmet Ghetto, and it makes amazing breads (and its next-door sister restaurant, Cheese Board Pizza, makes some of the best pizzas in town) and has a crazy cheese selection sourced from all over the planet, and it is one of THE foodie destinations of Berkeley (and it is across the street from Chez Panisse, so you can ogle another institution while you eat your pizza!). Both the pizzeria and the bakery are part of the same collectively owned business (together they are known as the Cheese Board Collective) and they have a pretty unique story of how they've worked to support other collectives/co-ops, and a number of years ago they did everyone a solid and made a cookbook.

And it is glorious.

Everything I've made out of that book is pure gold and tastes almost exactly how I remember Cheese Board pastries and pizza. Sure, I don't have a deck oven or a proofing cabinet, but the essence of every baked good is there. Ownership of this book (and therefore access to all of its secrets) is enough to make a Bay Area expat plant roots in a red state and say "We're good here."

At least for the time being.

And now a few words from the Voice of Experience to help you achieve your Chocolate Thing dreams! One, do not get super nit-picky about keeping all of the chocolate pieces in the dough when you first mix them in. Some of them will fall out. I'll give you a cheat for working them back in later. Two, use a wire or a floured piece of baker's twine to cut the rolled dough into rounds. This applies equal pressure on all sides of the roll so you end up with neat, photogenic little buns instead of rolls that are all smushed into ovals. Not that there is anything wrong with ovals! We are accepting of all shapes and sizes of rolls over here.

Finally, invite over some friends to help you eat the rolls, because these truly are best eaten warm from the oven while the dough is tender and the chocolate is slightly melty (and this way it saves you from eating all of the rolls yourself in one sitting, though you could probably have worse things happen to you, let's be honest).

Chocolate Things
adapted from the Cheese Board Collective Works cookbook - Makes 12 things

1/2 cup heavy cream
1/2 cup buttermilk
2 1/4 teaspoons active dry yeast
2 1/2 cups unbleached all-purpose flour
6 tablespoons unsalted butter at room temperature
1/3 cup sugar
2 eggs
1 1/2 teaspoon kosher salt
6 ounces dark chocolate, chopped into 1-inch pieces

In a small saucepan, heat the cream and buttermilk over low heat until small bubbles form around the edges of the pan. Pour into a bowl of a stand mixer or a large bowl (if mixing by hand). Let cool until just warm, then whisk in the yeast until dissolved. Let stand for 5 minutes.

If using a stand mixer, add the flour, butter, sugar, 1 of the eggs, and the salt to the bowl. With the paddle attachment on medium speed, mix until the ingredients are combined, about 2 minutes. If the dough is too soupy, add extra flour by the tablespoonful until the dough forms a loose ball around the paddle. Switch to the dough hook and knead on medium speed for 7 minutes, or until the dough is smooth, silky, and elastic. Add the chocolate and knead just long enough to incorporate it (do this step as quickly as possible, as overmixing will result in broken pieces of chocolate and discolored dough).

If making by hand, add the flour, butter, sugar, 1 of the eggs, and the salt to the bowl. Mix with a wooden spoon until combined. If the dough is too soupy, add extra flour by the tablespoonful. Transfer to a lightly floured surface and knead the dough for 10 minutes or until it is smooth, silky, and elastic. Flatten the dough into a 1-inch-thick round and place the chocolate in the center. Gather the dough around the chocolate and knead just long enough to incorporate it.

A quick note: I did a stand mixer/hand mix mash-up where I made the dough with the stand mixer, but kneaded in the chocolate pieces by hand. That seemed easiest to me (and kept chocolate pieces from ricocheting out of my mixer). Just FYI!

Form the dough into a ball and place it in a large oiled bowl. Turn the dough over to cover it with oil. Cover the bowl with plastic wrap or a damp kitchen towel and let rise in a warm, draft-free place for one hour, or until doubled in size. Alternatively, refrigerate the dough to rise slowly overnight. The next morning, remove the dough from the refrigerator and let stand in a warm place for at least an hour before proceeding.

Line a baking sheet with parchment paper or a baking mat. Transfer the dough to a lightly floured surface and roll it out into a 10 by 12-inch rectangle. Don't worry if pieces of chocolate fall out of the dough, just set them aside for the time being. In a small bowl, beat the remaining egg with a whisk. Using a pastry brush (or your fingers, which are easier to clean!) brush a stripe down one of the long edges (and save the leftover egg! You'll use it later!). Take all of the pieces of chocolate that fell out of the dough earlier and scatter them across the dough rectangle. Starting with the non-egg-wash coated edge, roll up the dough lengthwise into a jelly roll shape (rolling up the loose chocolate pieces as you go), using the egg-washed edge to seal the dough roll together. See what we did there? Sneaky, sneaky!

Using a sharp knife, a bench scraper, or a piece of wire or floured baker's twine, cut the roll into twelve 1-inch thick slices and place them on the prepared pan, cut side up, about two inches apart. Cover them with a kitchen towel and let rise in a warm place for 1 hour, or until the rolls are increased in size by one-third.

Fifteen minutes prior to baking, preheat the oven to 350˚F. Using a pastry brush (orrrr your fingerssss), brush the sides and tops of the each roll with the beaten egg. Bake on the middle rack of the oven for 30-35 minutes, or until golden brown. Transfer to a wire rack to cool, or to your face to be eaten.

weekday morning sufganiyot

autumn, breads, breakfast, desserts, snacks, spring, summer, vegetarian, winterFieldandForest7 Comments
4j5a2194.jpg

This post came about weirdly. It began with me wanting to bake something and it ended with me making sufganiyot (also known as Israeli doughnuts, also known as one of the top ten most delicious things on the planet), but somewhere in the middle there I spent 45 minutes standing over the vent in the oven door while it "preheated," flipping through cookbooks in an under-caffeinated haze and wishing that something bread-like and cakey would magically appear in front of me. Every day, lately, has had enough cloudiness and post-holiday malaise to be a potential baking day, albeit one where I am always out of something where 99.9% of the time something = buttermilk.

Note to self: buy buttermilk always. Every time you go to the store. No more of this faking it with milk and lemon juice. Buy buttermilk. BUUUUY IIIIIIIT.

And when you don't buy buttermilk, buy yogurt so you can make sufganiyot.

If you haven't made sufganiyot before, there is no time like the present. Seriously. It will take you 5 minutes to make the batter, and a minute or two of panfrying on each side to get you straight to Doughnutland. Or Sufganiyotville. Or wherever you want to go so long as it is crispy and covered in powdered sugar.

Weekday Morning Sufganiyot (Israeli Doughnuts)
recipe courtesy of my mom <3
I would take these little fritters over raised glazed doughnuts any day. If someone tells you they are having a bad day, make them these; they will feel better. If you are having a bad day, make them for yourself; you will feel better. If you or someone else is having a good day, make them anyway! You have to eat breakfast, right?

1 1/2 cups flour
1 t. baking powder
1 T sugar
1 egg
1 cup yogurt
canola oil or ghee

Mix all ingredients together.  Heat oil or ghee in frying pan (enough to completely coat the bottom of the pan).  Once the oil is hot, drop tablespoons of batter into the pan.  Carefully flip when brown.  Briefly (for 5-10 seconds) rest cooked sufganiyot on a paper towel, roll in powdered sugar, and serve immediately with jam.